Every website owner needs to concentrate on one important thing and that is SMTP configuration. Today in this case study I’m gonna guide you on how to configure SMTP to my WordPress Website.
Before discussing in detail let me clear one thing that I am using G Workspace (former G Suit) email with the name of help@bivatechnologies.
I’ve purchased that email from G Workspace. So this configuration is based on my G Workspace email id. Don’t worry! This case study will help you to configure any email.
Here are step by step activities that I did for my website Biva Technologies.
According to some digital marketer, the gmail configuration for SMTP is tough enough. I do not agree entirely.
As a digital marketing company in India, SMTP configuration is one of our regular activities.
I also admit one reality that to configure Gmail for SMTP, you have to know a little bit of technicality.
As a digital marketing professional or a blogger, it is better to know little bit technicalities.
So, don’t worry.
I am here to disclose everything in detail.
Don’t skip this article, if you really wanna configure SMTP to your WordPress site.
Install an SMTP WordPress Plugin
WordPress is easy to configure for the availability of many plugins and tools. One of the most important plugins is WP Mail SMTP.
If you don’t know how to install this plugin in WordPress, follow the steps below:
- Login your WordPress dashboard.
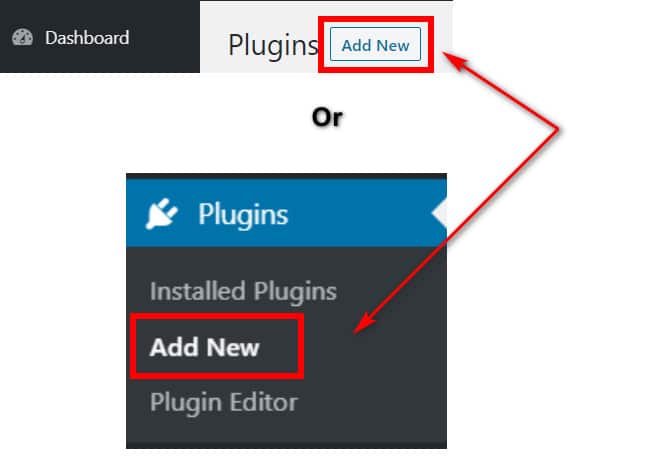
- Go to Plugin section at the left hand side (default)
- Click Add New
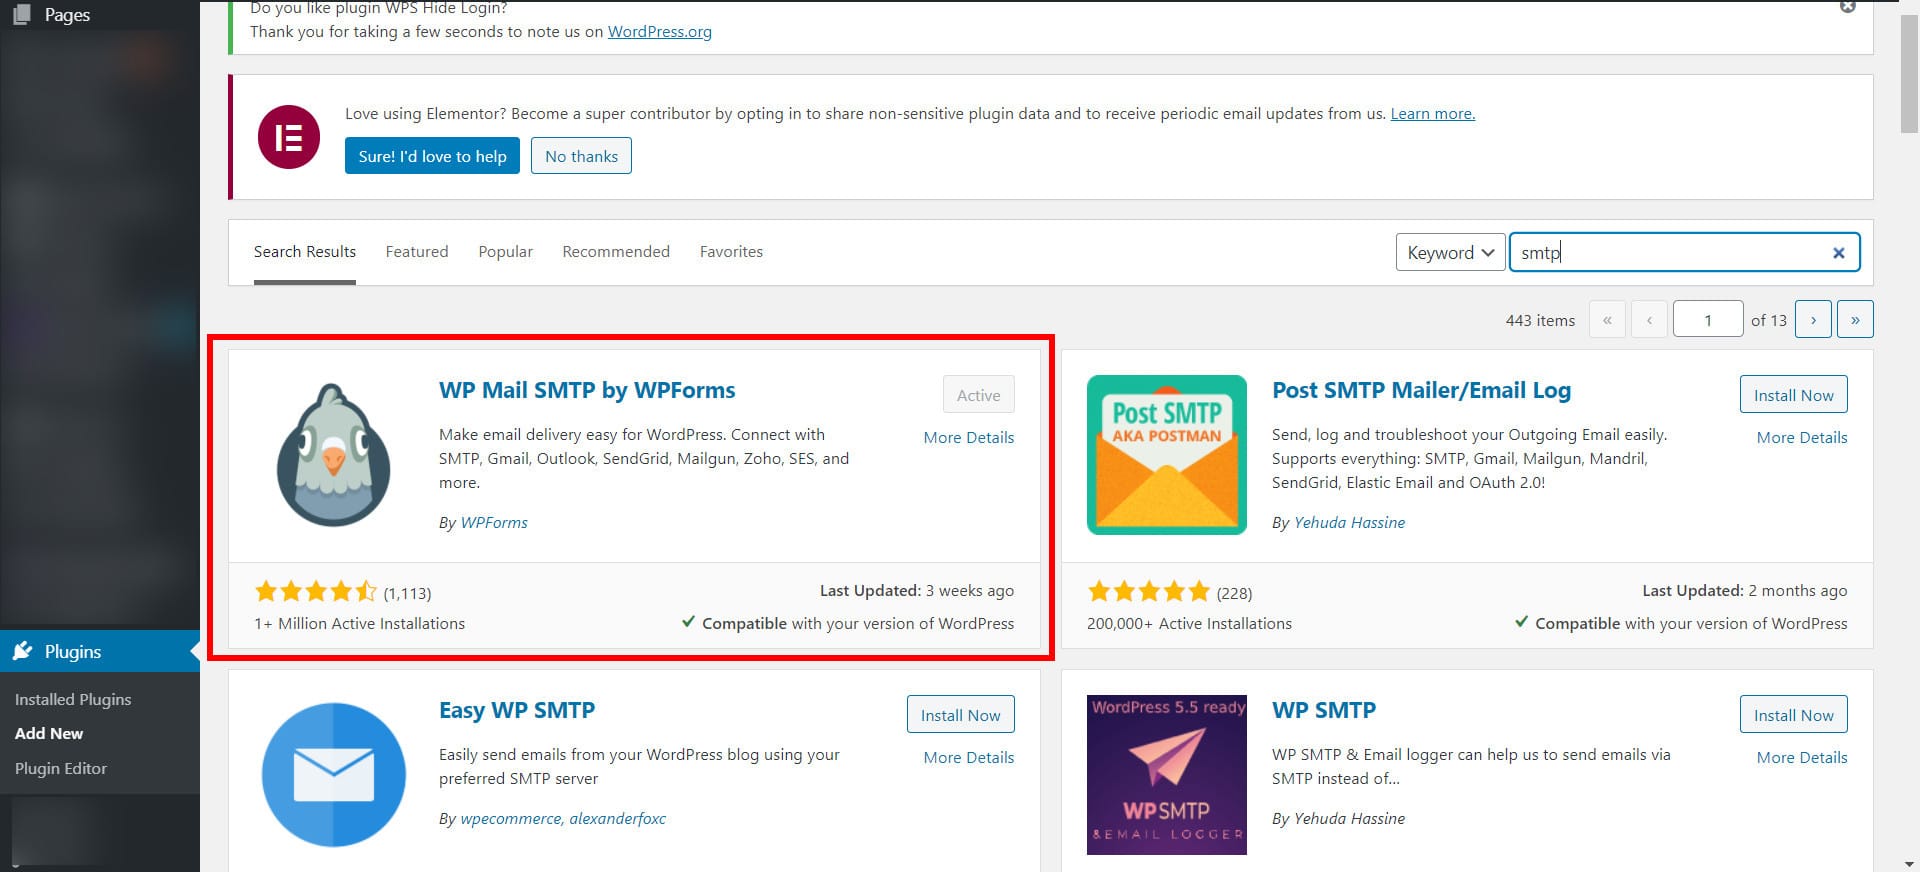
- Type SMTP
- Choose any SMTP plugin, then instal.
- You can upload any SMTP plugin if you have already downloaded it or purchased it.
- Activate the plugin.
Note: You can install any SMTP plugin to configure SMTP. However, I have used this plugin in this case study.
Remember, if you have basic sense, you can easily configure any SMTP plugin easily.
Settings of WP Mail SMTP
You know the settings is the dashboard of this plugin.
Here you needs to concentrate on two things:
- Choose the Gmail mailer and
- The name of sender
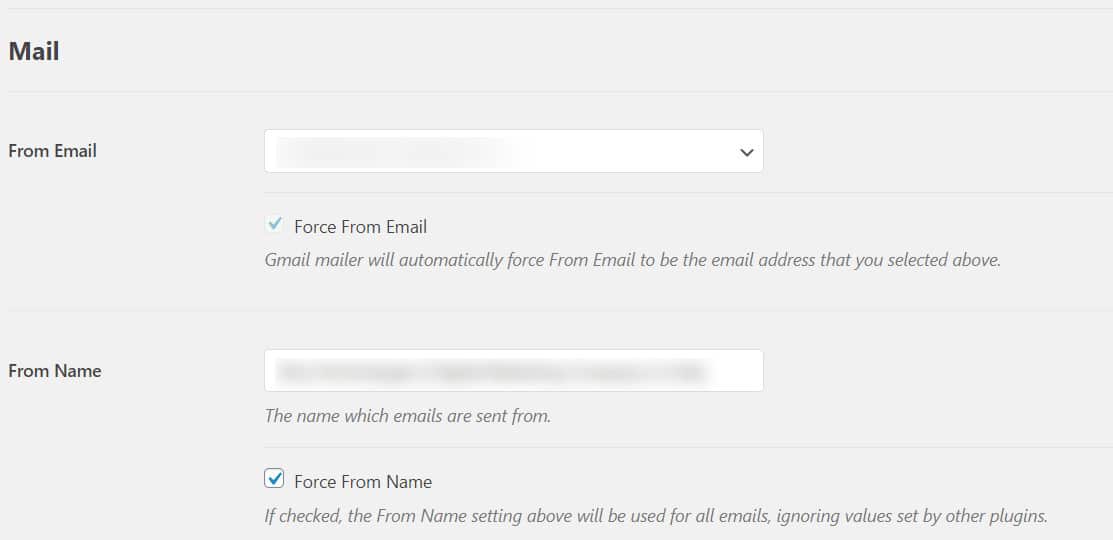
- Choose the mailer.
Here I’ve used Gmail (Google). You can choose of your own.
Right now you need Client Id and Client Secret to configure properly.
How to get Client Id and Client Secret
Client Id and secret is essential. So, you need to create those.
Follow the steps to generate client id and secret to configure SMTP.
To generate client id and secret you need to create a web app first using the steps below.
- Login Google Developer Console with your Gmail id.
- If you have purchased G Workspace (former g suite) email id, better to log in with that.

- Create a project with a valid name (follow the above)
- If you already created a project, skip creating, select that project.
- Then enable Gmail API

- Again go to Credentials then API section (left hand side) and choose Gmail API
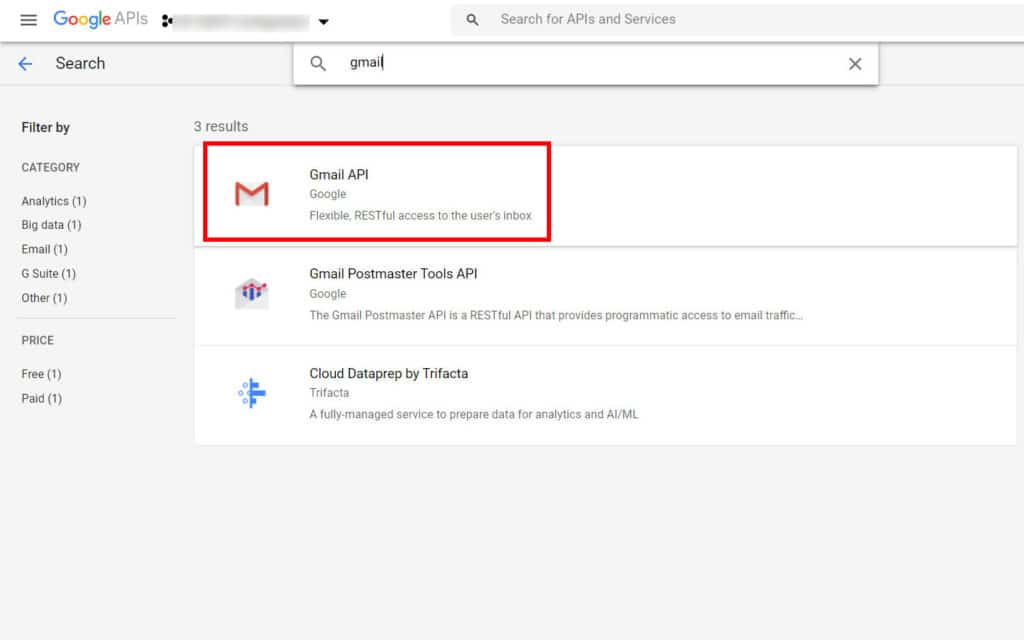
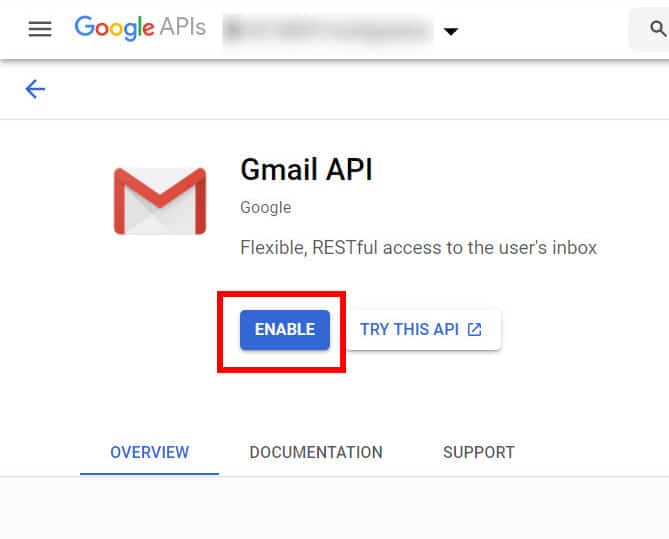
- Then enable it and go for create credentials
- Start adding credentials to the project you already created.
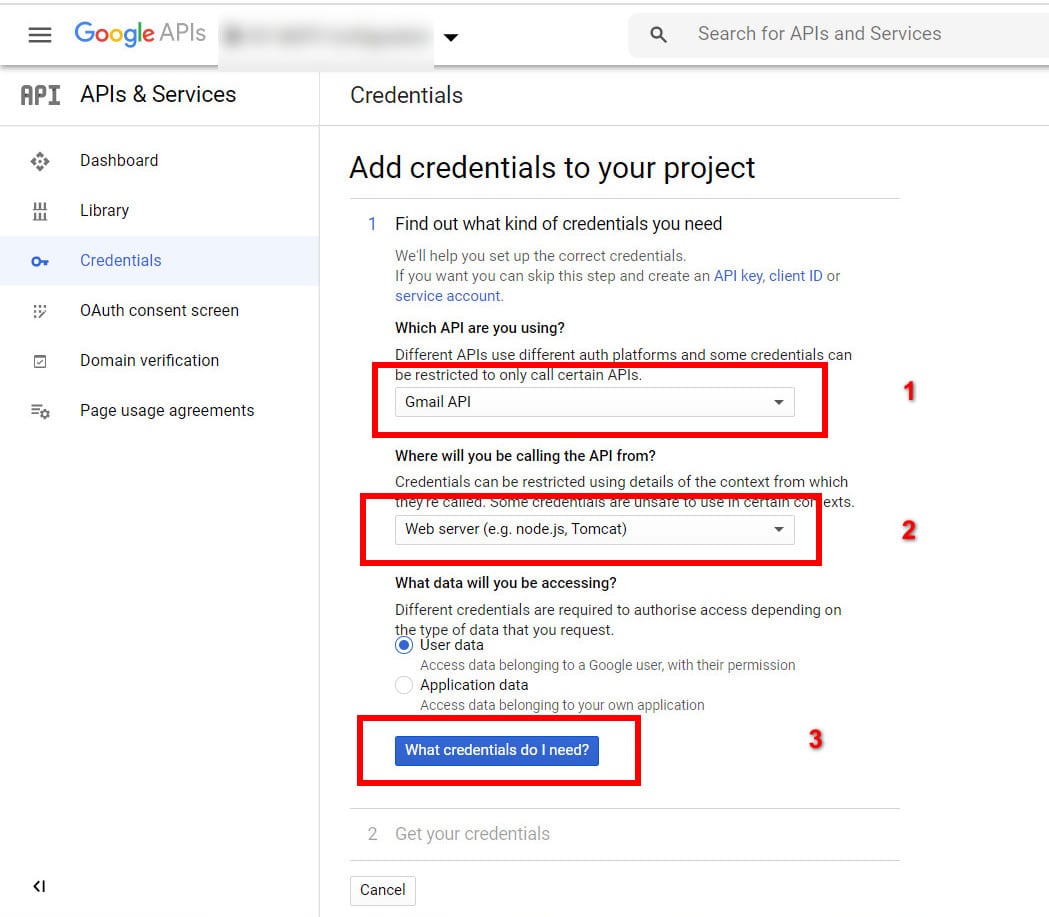
Be careful while creating credentials.
Remember always
- The first one means ‘which API’ section should be Gmail API
- The second one where from you inherit your API would be your Web Server
- Use the radio button User Data activated and then
- Click on ‘What credentials do I need’ button to set up the OAuth Consent Screen.
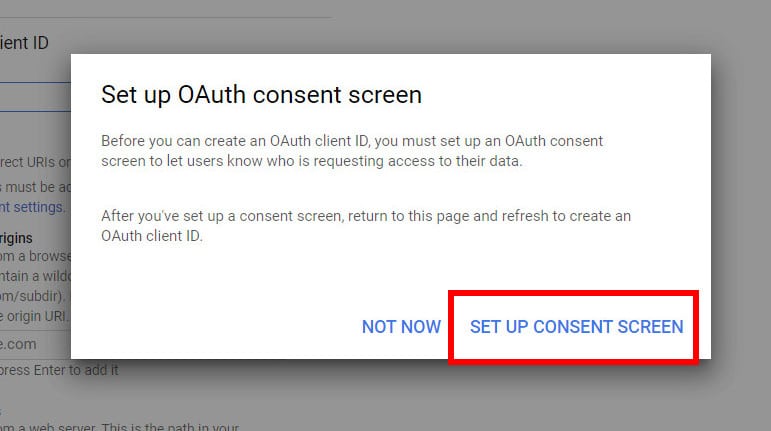
Now you need to concentrate here because it helps to produce client id and secrets.
First, you need to clear one thing that, the user type is internal if you use G Workspace (G Suite) mail. otherwise use the external (public) as the same.
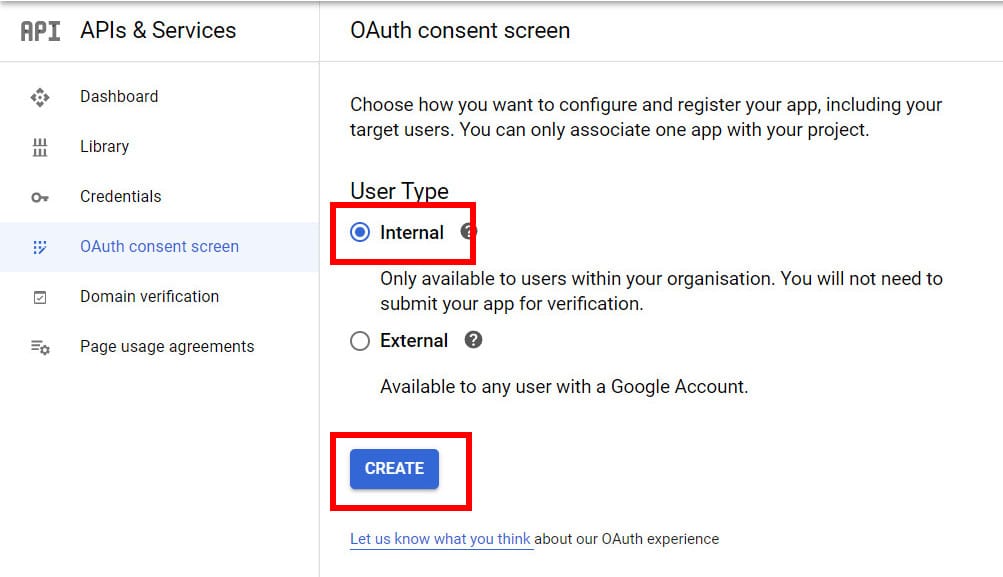
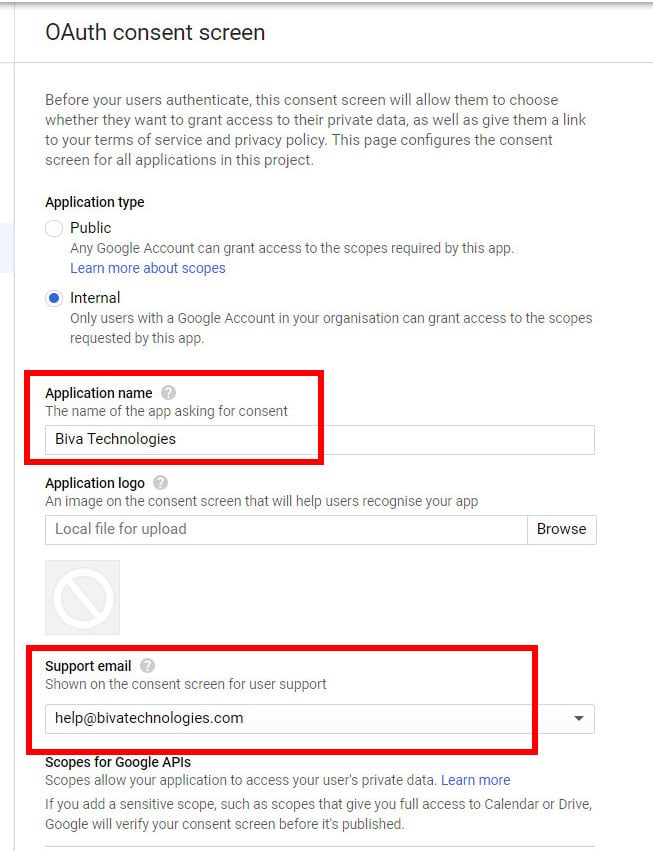
Now fill all important fields like
- Application name as your Website name. For example Biva Technologies
- Application Logo (optional)
- Support Email id
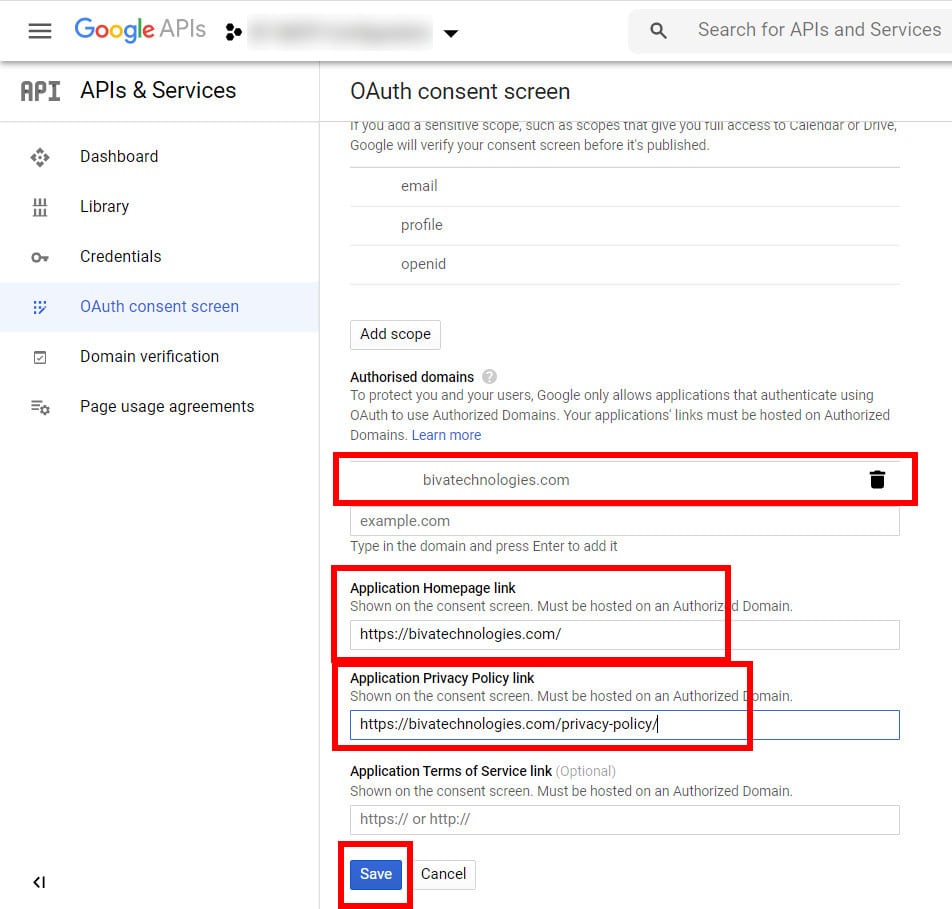
- Add authorized domain. Here I’ve added my domain bivatechnologies.com
- Application Homepage URL like https://bivatechnologies.com
- Then add privacy policy page URL and go to Save button.
After clicking on save button, you will need to put redirect url. For that, you need to go to your plugin again.
Then copy the redirection URL and paste at that redirection URL section.
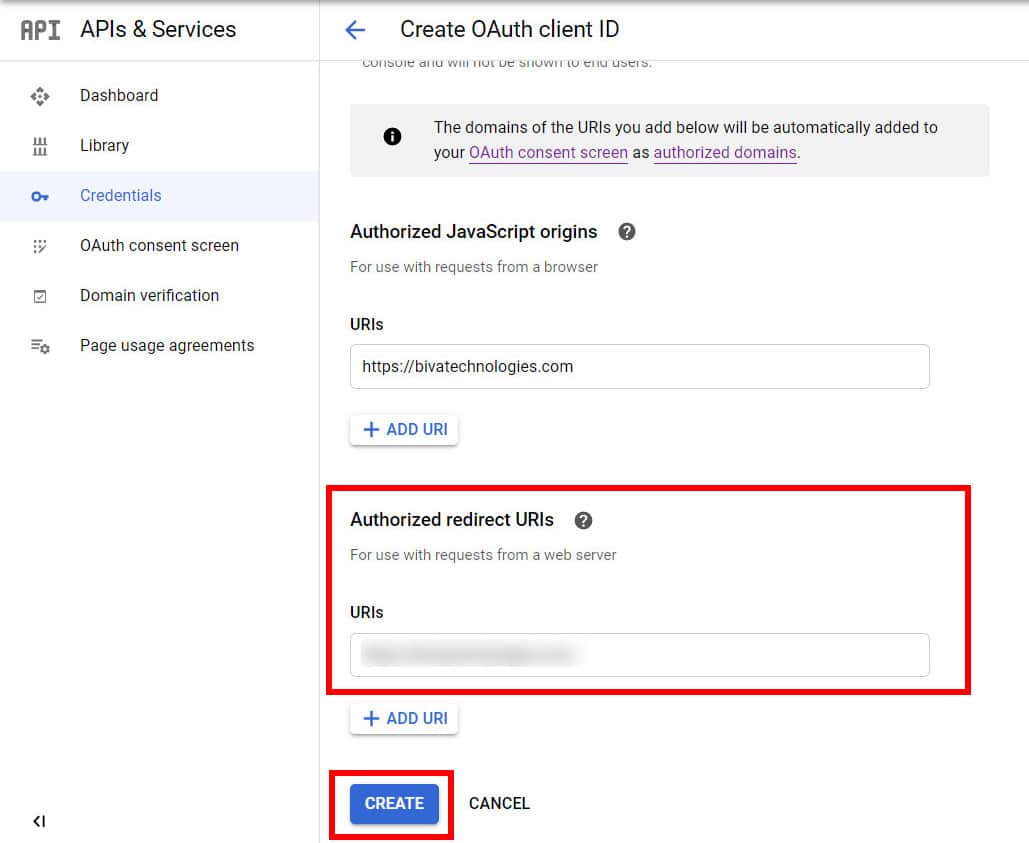
Now you are very close to get client id and secret.
You’ve got your client Id and client secret. Simply copy them one by one and paste them in your plugin dashboard.
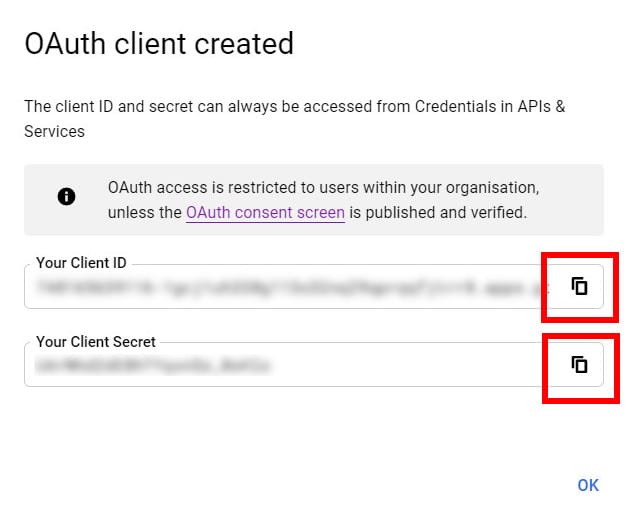
SMTP Configuration from Plugin End
You can download credentials for further use.
This is the step to generate Client id and secret. Now let’s finish the plugin configuration.
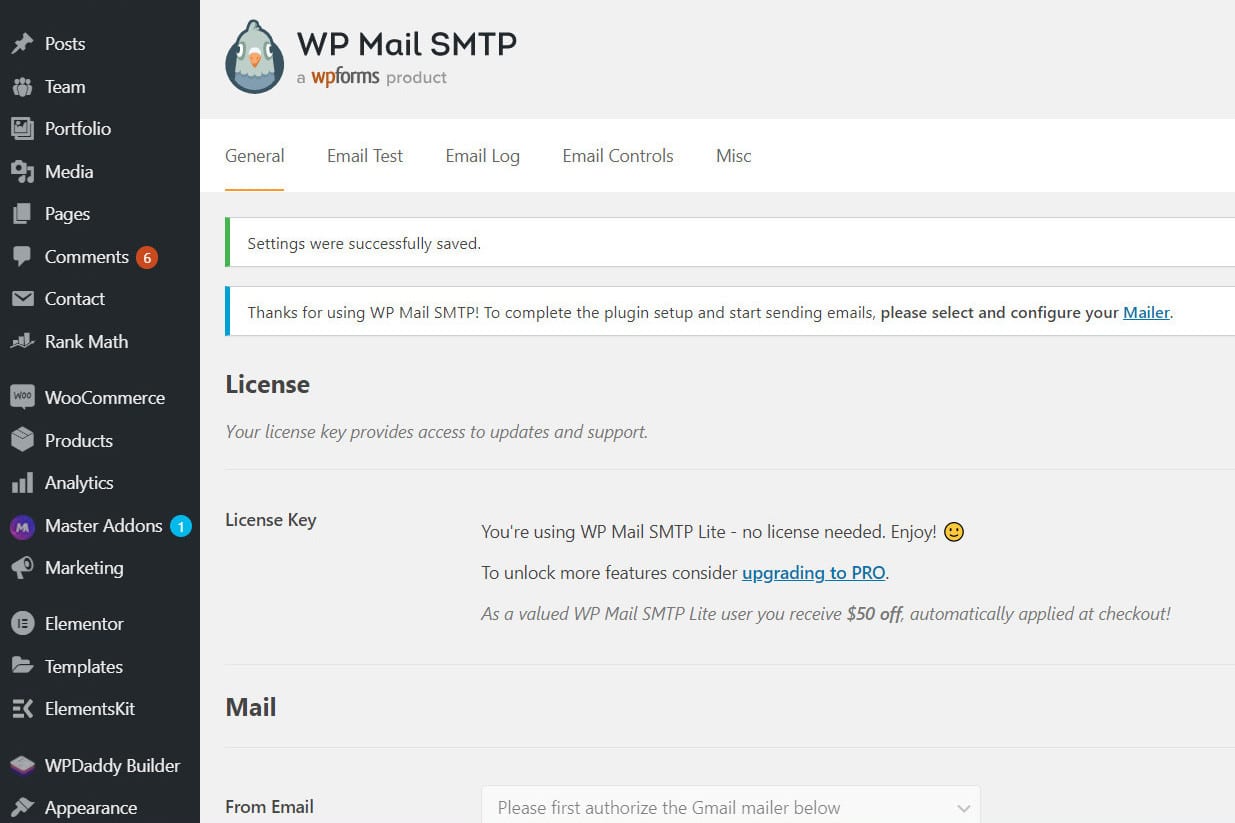
After finishing everything you’ll need to refresh your page once and check if the settings are successful.
Now, it is time to allow your gmail to access permission to send mail.
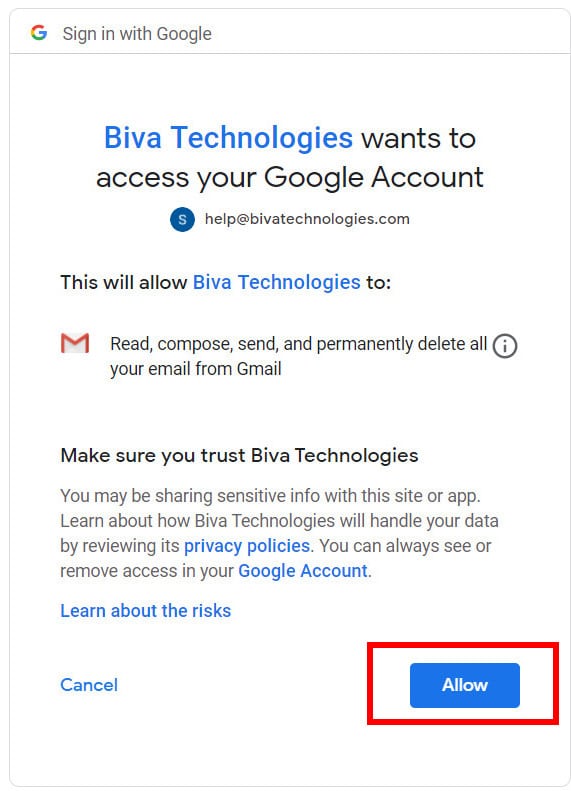
After the above process, it is time to check if your SMTP is configured properly.
To ensure that, you need to focus one easy step.
Go to the Email Test tab and put any email Id and turn on the HTML button. Then click on the send email button.
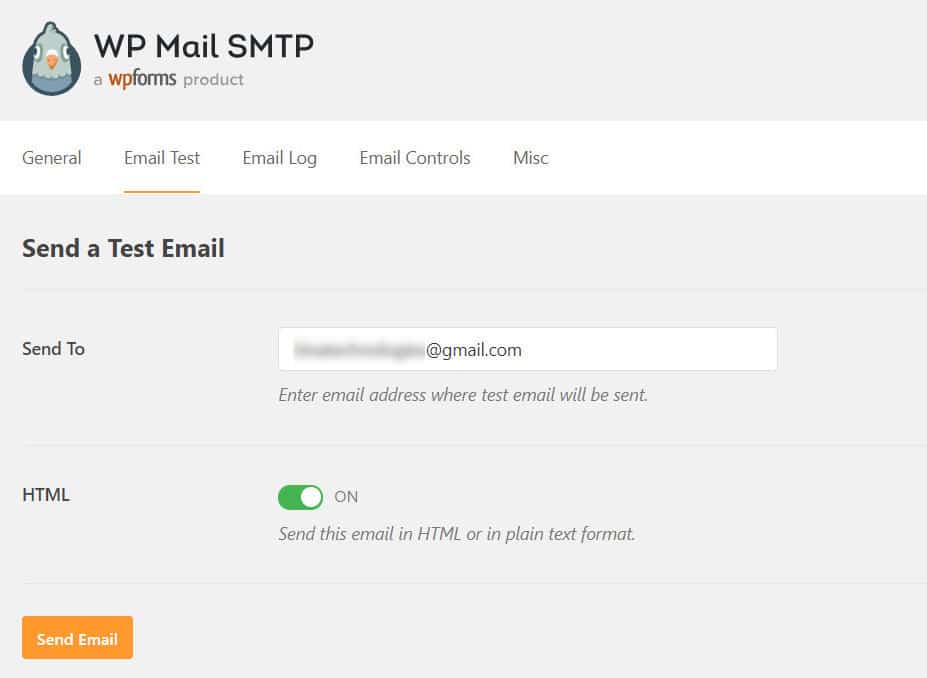
You need to check once if you’ve got that test mail direct to your inbox. For that
Login to your Gmail or any email account with right email login credentials.
- Go to the inbox.
- Check if the Test Email is received.
Interestingly, you will get the email from the name you selected (your website name).
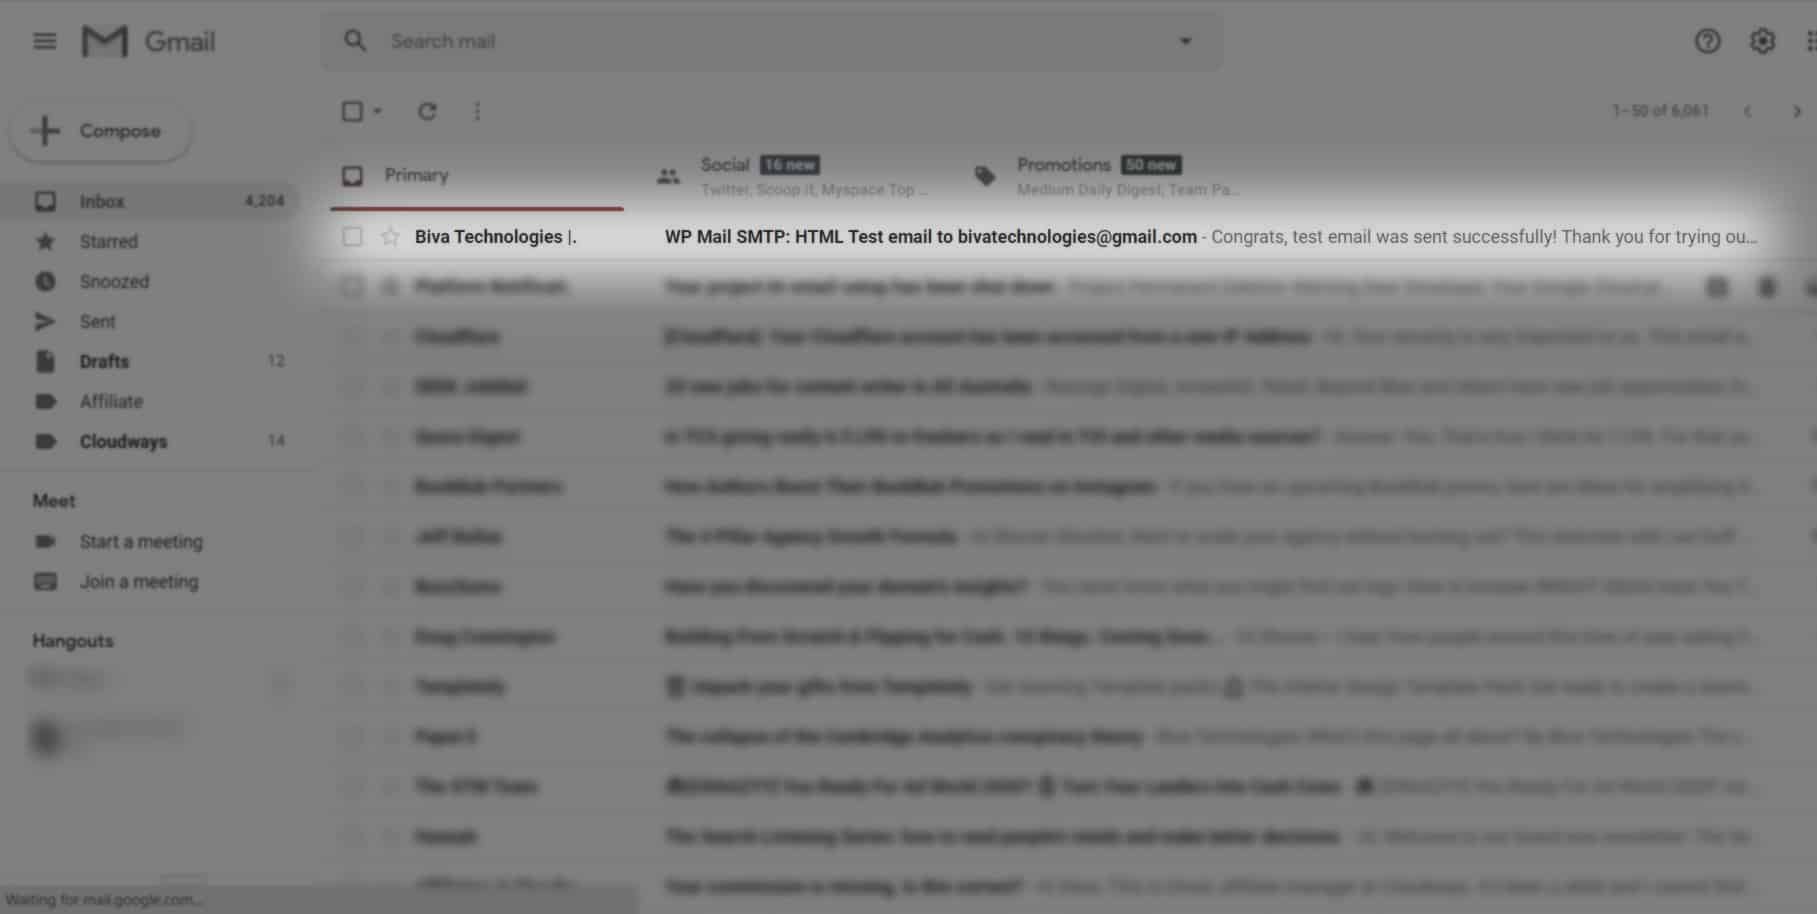
Open the mail once and check the following.
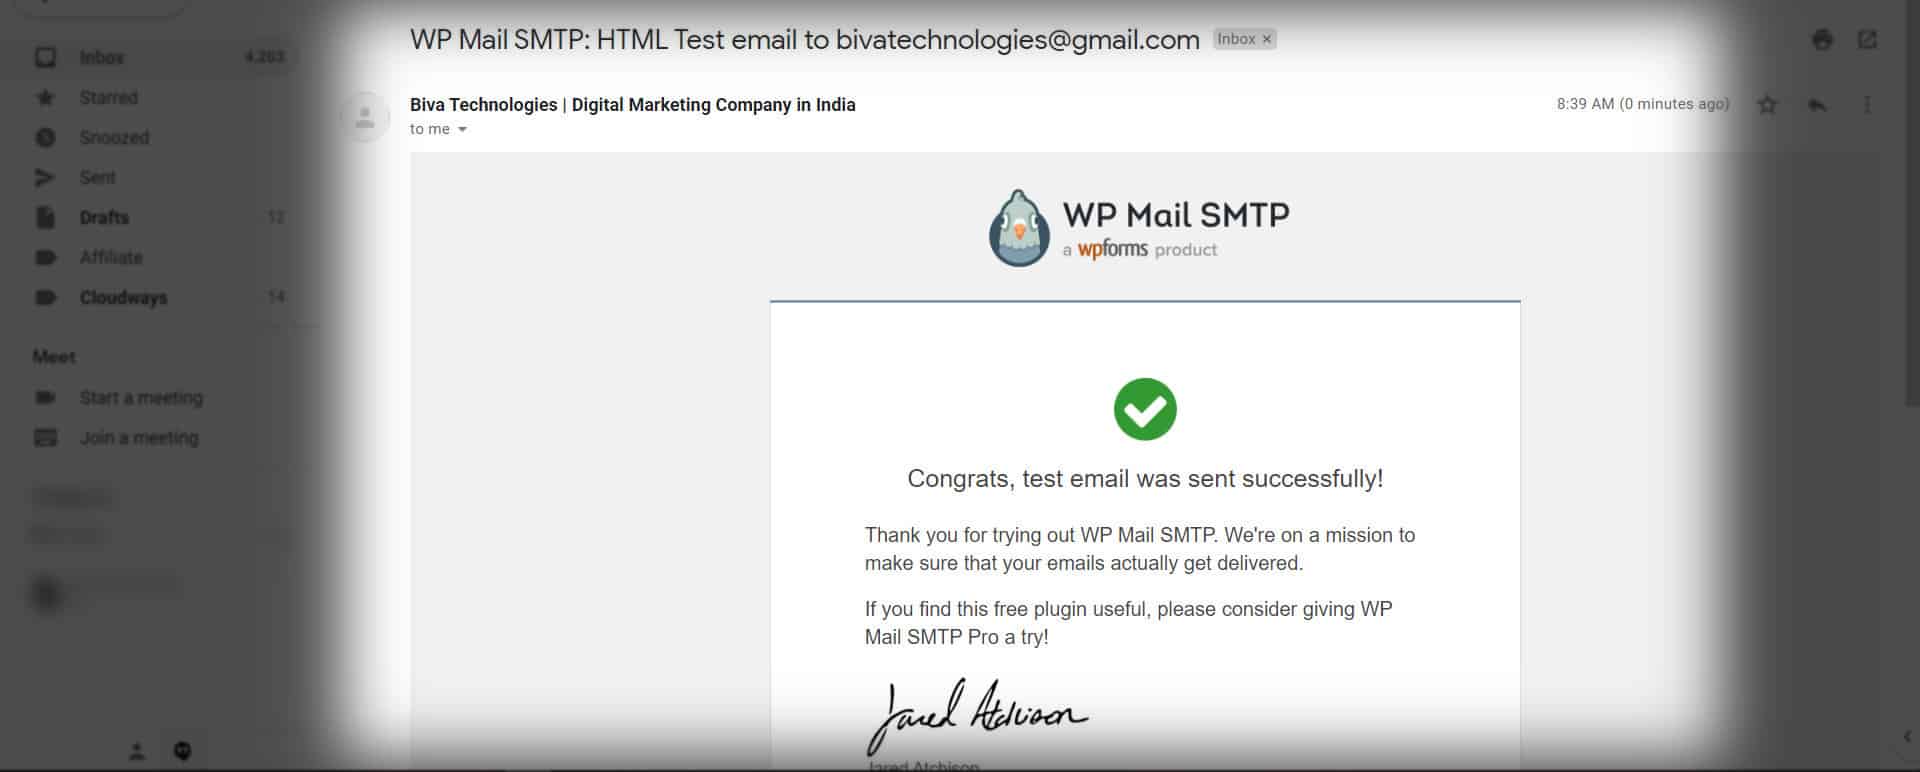
Yes, now your SMTP Configuration is complete.
Every SMTP configuration needs almost the above steps. So, if you wanna configure any SMTP, you can use this steps.
For better understanding, I conclude it. For SMTP configuration, follow steps below.
- Login your WordPress Dashboard.
- Go to the Plugin section
- Click Add new
- (You can upload your downloaded SMTP plugin)
- Search any SMTP plugin and install it.
- Activate that plugin.
- Go to Google Developer Console for Client Id and Client Secret.
- Create a project or use any existing project.
- Enable and choose Gmail API
- Configure OAuth Credentials properly in the right direction.
- Copy client id and secrets and go to your plugin and paste.
- Allow permission from Gmail.
- Send a test mail to ensure the whole process.
- Check inbox, if mail is used with your business or website name (whatever you gave).
- Open the mail manually.
Sum Up
So, these above steps definitely help you to configure SMTP. SMTP configuration is very easy if you have a little bit of technical knowledge. This is a kind of case study, I recently experience with my website. So all the information shown here is genuine. today every type of online business from small to big, blogging to service, the SMTP configuration is next to essential. If you have any questions, advice, suggestion, you can communicate with me.
I am a Digital Marketing Trainer, Digital Marketing Strategist, Career Coach, Affiliate Marketer, Content Writer, SEO Professional, Paid Advertisement Specialist, Social Media Expert, and Entrepreneur. I am the founder of Biva Technologies, Hungry Tourer and more. I assure quality and productive Digital Marketing Training and Services.
Since 2018 I have been providing quality Digital Marketing Training and Services at Biva Technologies. Some of our top-rated services are:
Digital Marketing Training
Full Digital Marketing Services
Content Writing
SEO
PPC (Paid Advertisement)
Content Marketing
Email Marketing
Meta (Facebook) Ads
Video Marketing and More.
Follow and Contact me: LinkedIn, YouTube, Facebook, Instagram, X (Former Twitter), Google Business Profile

